


Finding the right cloud service for developers could often be challenging. That is why we will be using Cloudinary. Cloudinary is a cloud service that provides free services to developers. So without wasting much time, let’s get started.
The gist of what we will be doing:
We will send the image from the client to the server using an Axios call.
Then we will save the image in local storage using multer.
Then from local storage, we will send the image to Cloudinary and get the image URL in response.
The entire project is uploaded here: https://github.com/DugarRishab/cloudinary_trials
Pre-requisites:
Knowledge of MERN stack (basic)
Knowledge of a few basic git commands
Technologies Used:
MongoDB and Mongoose (for database management)
React.js (for front-end)
Cloudinary (for cloud storage)
Now that all the formalities are done, let’s start by importing the projects. These projects are basic react-app and node-server. Think of them as templates on which we will be working.
Getting started with Cloudinary
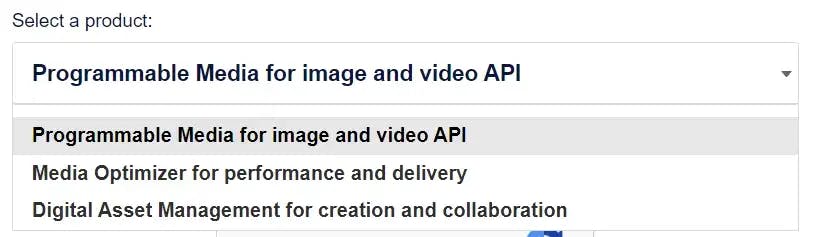
Go to https://cloudinary.com/users/register/free to signup. Now fill up the form. In the “Select a product” section, select the “Programmable Media” option. Complete the rest of the process.
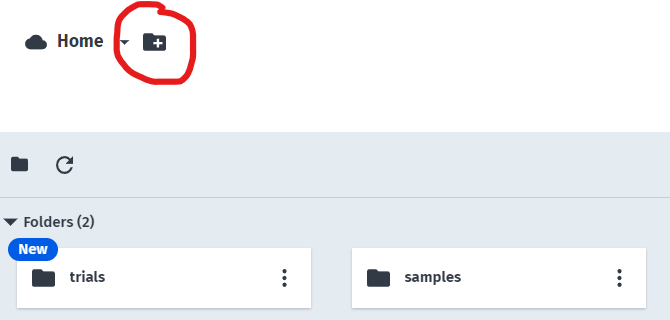
Now that you have registered go to the dashboard. We will need it later. Now let's move forward by creating a folder. Click on the marked icon to create a folder and let's name this folder “trials”.
These folders are used to group our images. Now go to settings and under the “upload” tab scroll down to “Upload Presets:”. Presets are pre-defined settings that will be applied to every image uploaded to the preset. Now press the “Add upload Preset” button. A form should open up.
Give a name to this preset, let's name it “trials”. Then in the folder section, enter the name of the folder we just created. Leave the rest of the settings as it is. Feel free to experiment with the other settings. Now click save. You just created your 1st preset. This preset will send all the uploaded images to the folder we just created.
Setting up the project
Clone repo from Git:
Enter the following code in the terminal.
git clone https://github.com/DugarRishab/template.git
This repo has a template react app and node server. We will be using this template to build our project. You may use this for building other projects too.
Now let's install all the required node modules.
cd ./client
npm install
npm start
In another terminal
cd ./server
npm install
You must have noticed that we did not start the server. this is because we need a .env file before that. So let's create a config.env file.
NODE_ENV=production
PORT=8000

REMOTE=http://localhost:3000

CLOUD_NAME= <CLOUD_NAME>
CLOUDINARY_API_KEY= <API_KEY>
CLOUDINARY_API_SECRET= <API_SECRET>
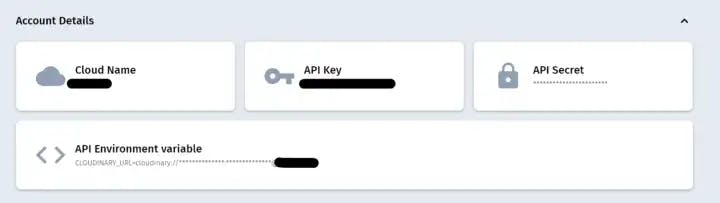
Replace the <CLOUD_NAME> with the Cloud name, you saw earlier. To get your API key and API secret go to your dashboard page.
WARNING: Never reveal your api_secret to anyone
Replace the variables in the config.env file. Now enter npm run start:dev to start the server. Both the server and client should be running fine now.
Implementing Cloudinary
Getting images from React and saving Image URLs (Back-end)
We will be working in the server folder in this section.
Let's start by installing some node modules. Enter the following code in the terminal.
cd ./server
npm i cloudinary multer
Create a folder named: uploads in the server. This folder will be temporary storage for the images before they are uploaded to server. Now create a file called multer.js in utils folder of the server. This file will be the config file for multer. Multer is a middleware that helps us save images in our memory. Now enter the following code in this file.
const multer = require('multer'); // Multer hepls us save imgs recieved from request in memory

const storage = multer.diskStorage({
    destination: function (req, file, cb) {
        cb(null, 'uploads/');
    },
    filename: function (req, file, cb) {
        cb(null, file.originalname);
    },
});

const fileFilter = (req, file, cb) => {
    if (
        file.mimetype === 'image/jpeg' ||
        file.mimetype === 'image/jpg' ||
        file.mimetype === 'image/png' ||
        file.mimetype === 'image/webp'
    )
        cb(null, true); // this means file should be accepted
    else cb(null, false); // this means file should not be accepted
};

exports.upload = multer({
    storage: storage,
    limits: {
        fileSize: 1024 * 1024 * 10,
    },
    fileFilter: fileFilter,
});
Now let's create a Cloudinary config file called cloudinary.js in the utils folder of the server. Enter the following code in this file.
const cloudinary = require('cloudinary').v2;

cloudinary.config({
    cloud_name: process.env.CLOUD_NAME,
    api_key: process.env.CLOUDINARY_API_KEY,
    api_secret: process.env.CLOUDINARY_API_SECRET,
});

module.exports = { cloudinary };
Now that our config files are ready, we will create imageController.js in controllers of the server. Now enter the following code to this file.
const multer = require('multer');

const AppError = require('./../utils/appError');
const catchAsync = require('../utils/catchAsync');

const { cloudinary } = require('../utils/cloudinary');
const { upload } = require("../utils/multer");

exports.uploadImage = catchAsync(async (req, res, next) => {

    let cloudinaryResponse;

    if (req.file) {
        cloudinaryResponse = await cloudinary.uploader.upload(req.file.path, {
            upload_preset: 'trials',
        });
    } else {
        return next(new AppError('Please provide a file', 400));
    }

    res.status(200).json({
        status: 'success',
        data: {
            imageUrl: cloudinaryResponse?.url,
        },
    });
});
The function uploadImage will send the image from our local memory to Cloudinary. Then Cloudinary will provide us with the URL to the image.
Now let's add a route in our route.jsfile of the server to call this controller. Edit the route.js file as shown below:
const express = require('express');
const imageController = require('../controllers/imageController');  // <- This is a new Line
const { upload } = require('../utils/multer');  // <- This is a new Line

const Router = express.Router();

Router.post("/", upload.single('image'), imageController.uploadImage);  // <- This is a new Line

module.exports = Router;
Explanation:
Once a new request is registered,
app.jswill send it toroutes.jsfile.The
uploadmiddleware will store the image in the local storage.Then the
uploadImagemiddleware will upload it to Cloudinary and get back a URL through which the uploaded image could be accessed.
Our server side is now ready. We will now configure the client side.
Uploading Images on the Client-side
Let's start by installing Axios. Enter the following code in the terminal.
cd ../client
npm i axios
Now we will create a api.js file in the src folder of client. This file will do an AJAX call through Axios to our API.
import axios from "axios";

const API = axios.create({
    baseURL: "http://localhost:8000/api/v1",
});

export const postImage = (data) =>
    API.post("/", data, {
        headers: {
            "Content-Type": "multipart/form-data",
        },
    });
multipart/form-data allows us to send data in various file types like .jpg or .png, among others.
Note:
multipart/form-datais important. This will not work with any other content type.
Now lets add a upload image button in App.jsx file. Edit the file as shown below.
import React, { useEffect, useState } from "react";
import logo from "./logo.svg";
import "./App.css";
import { postImage } from "./api";

function App() {
    const [imagePreview, setImagePreview] = useState(""); // <- To
    const [imageFile, setImageFile] = useState({});
    const [imageUrl, setImageUrl] = useState(null);

    const handleImagePreview = (e) => {    // <- This will let you preview the uploaded image
        const file = e.target.files[0];
        setImageFile(file);

        if (file) {
            const reader = new FileReader();

            reader.addEventListener("load", e => {
                setImagePreview(e.target.result);
                console.log(e.target.result);
            });

            reader.readAsDataURL(file);
        }
    };
    const handleSubmit = async () => {    // <- This will send the selected image to our api
        try {
            const res = await postImage({ image: imageFile });
            console.log(res.data.data.imageUrl);
            setImageUrl(res.data.data.imageUrl);
        }
        catch (err) {
            console.log(err)
        }
    }

    return (
        <div className="App">
            <div className="uploadImage">
                <input
                    type="file"
                    accept="image/png, image/jpg, image/jpeg, image/webp"
                    onChange={(e) => handleImagePreview(e)}
                />
            </div>

            <button type="submit" onClick={handleSubmit}>
                Submit
            </button>
            <p>{imageUrl}</p>
            <div
                className="image-preview-div"
                style={{ display: imagePreview === "" ? "none" : "flex" }}
            >
                <img src={imagePreview} alt="" />
            </div>
        </div>
    );
}

export default App;
Explanation:
Once you select you image, the
handleImagePreviewfunction will convert your image into a readable format for the app, then send it to html for preview.The
handleSubmitfunction will send the image to our api using theapi.jsfile.
Congrats! You just uploaded your 1st image to Cloudinary
Everything is now completed. Try to upload an image and then open your Cloudinary to view those uploaded images.