


Authentication and authorization is a very important domain in web development. Since creating a traditional authorization system, especially with the MERN stack is tough, Google has come to our rescue with its authentication system which can be easily integrated into any web app, called Google OAuth 2.0.
What is OAuth 2.0 and why do you we use it?
OAuth 2.0 is the most popular version of OAuth, the Google authentication system. Often while signing in on websites, you must have seen “Sign in with Google”. This is the OAuth2.0 we will be discussing here. You might have already experienced it, Yu can sign in to any website with only one tap. Sounds convenient right? It gets even better as it is even easier for developers to integrate OAuth instead of creating their traditional system.
The gist of what we will be doing:
We will first create our API key for accessing OAuth.
Now, we will integrate OAuth into our MERN stack.
We will also see how we can create secure cookies using info from Google.
The entire project is uploaded here: https://github.com/DugarRishab/oauth_trials
Pre-requisites:
Knowledge of MERN stack
Knowledge of cookies and how they work.
Cloning Project Template:
Here we will use this template to build our app. All basic functionalities are already implemented. You will need to make your own config.env file with the required global variables. To clone enter:
git clone https://github.com/DugarRishab/template
Getting started with OAuth2.0
Go to the Google Cloud console > APIs & Services > Credentials or directly click on this link: https://console.cloud.google.com/apis/credentials
Creating a Project
Start by creating a project. Click on the projects option on the top left side. Then click on NEW PROJECT and fill out the form to create a new project.

Configuring Consent Screen
Now we will configure the OAuth consent screen. Click on the OAuth consent screen option from the Left Menu. Select user type: external and click on create.
Under “OAuth consent Screen” fill out App information. You can leave App Domain empty for now. Now under Authorized domains, add the domain for your API and the React website. If you don’t have any domain right now, leave it empty. Then Add the developer email and click continue.
Now under “Scopes”, click on “ADD OR REMOVE SCOPES” and select
/auth/userinfo.emailand/auth/userinfo.profileand click “UPDATE” and click continue.Now under “Test Users”, Add some test emails and click on continue.
NOTE: only real Gmail accounts will be allowed, and emails like: test@email.com will not be allowed
Review all data and click on continue, now you have set up your consent screen.
Creating Credentials
Now let’s go back to the “Credentials” page. Click on “CREATE CREDENTIALS” and select “OAuth Client ID”.
Select “Web Application” under “Application type”.
Now under “Authorized JavaScript origins” add all the URLs from where you will access OAuth, like your real and server URL. Also, don’t forget to add your local host. Then click Enter.
You have not successfully created your OAuth key. Now download the key, we will need it later. Now we will work on our web application.
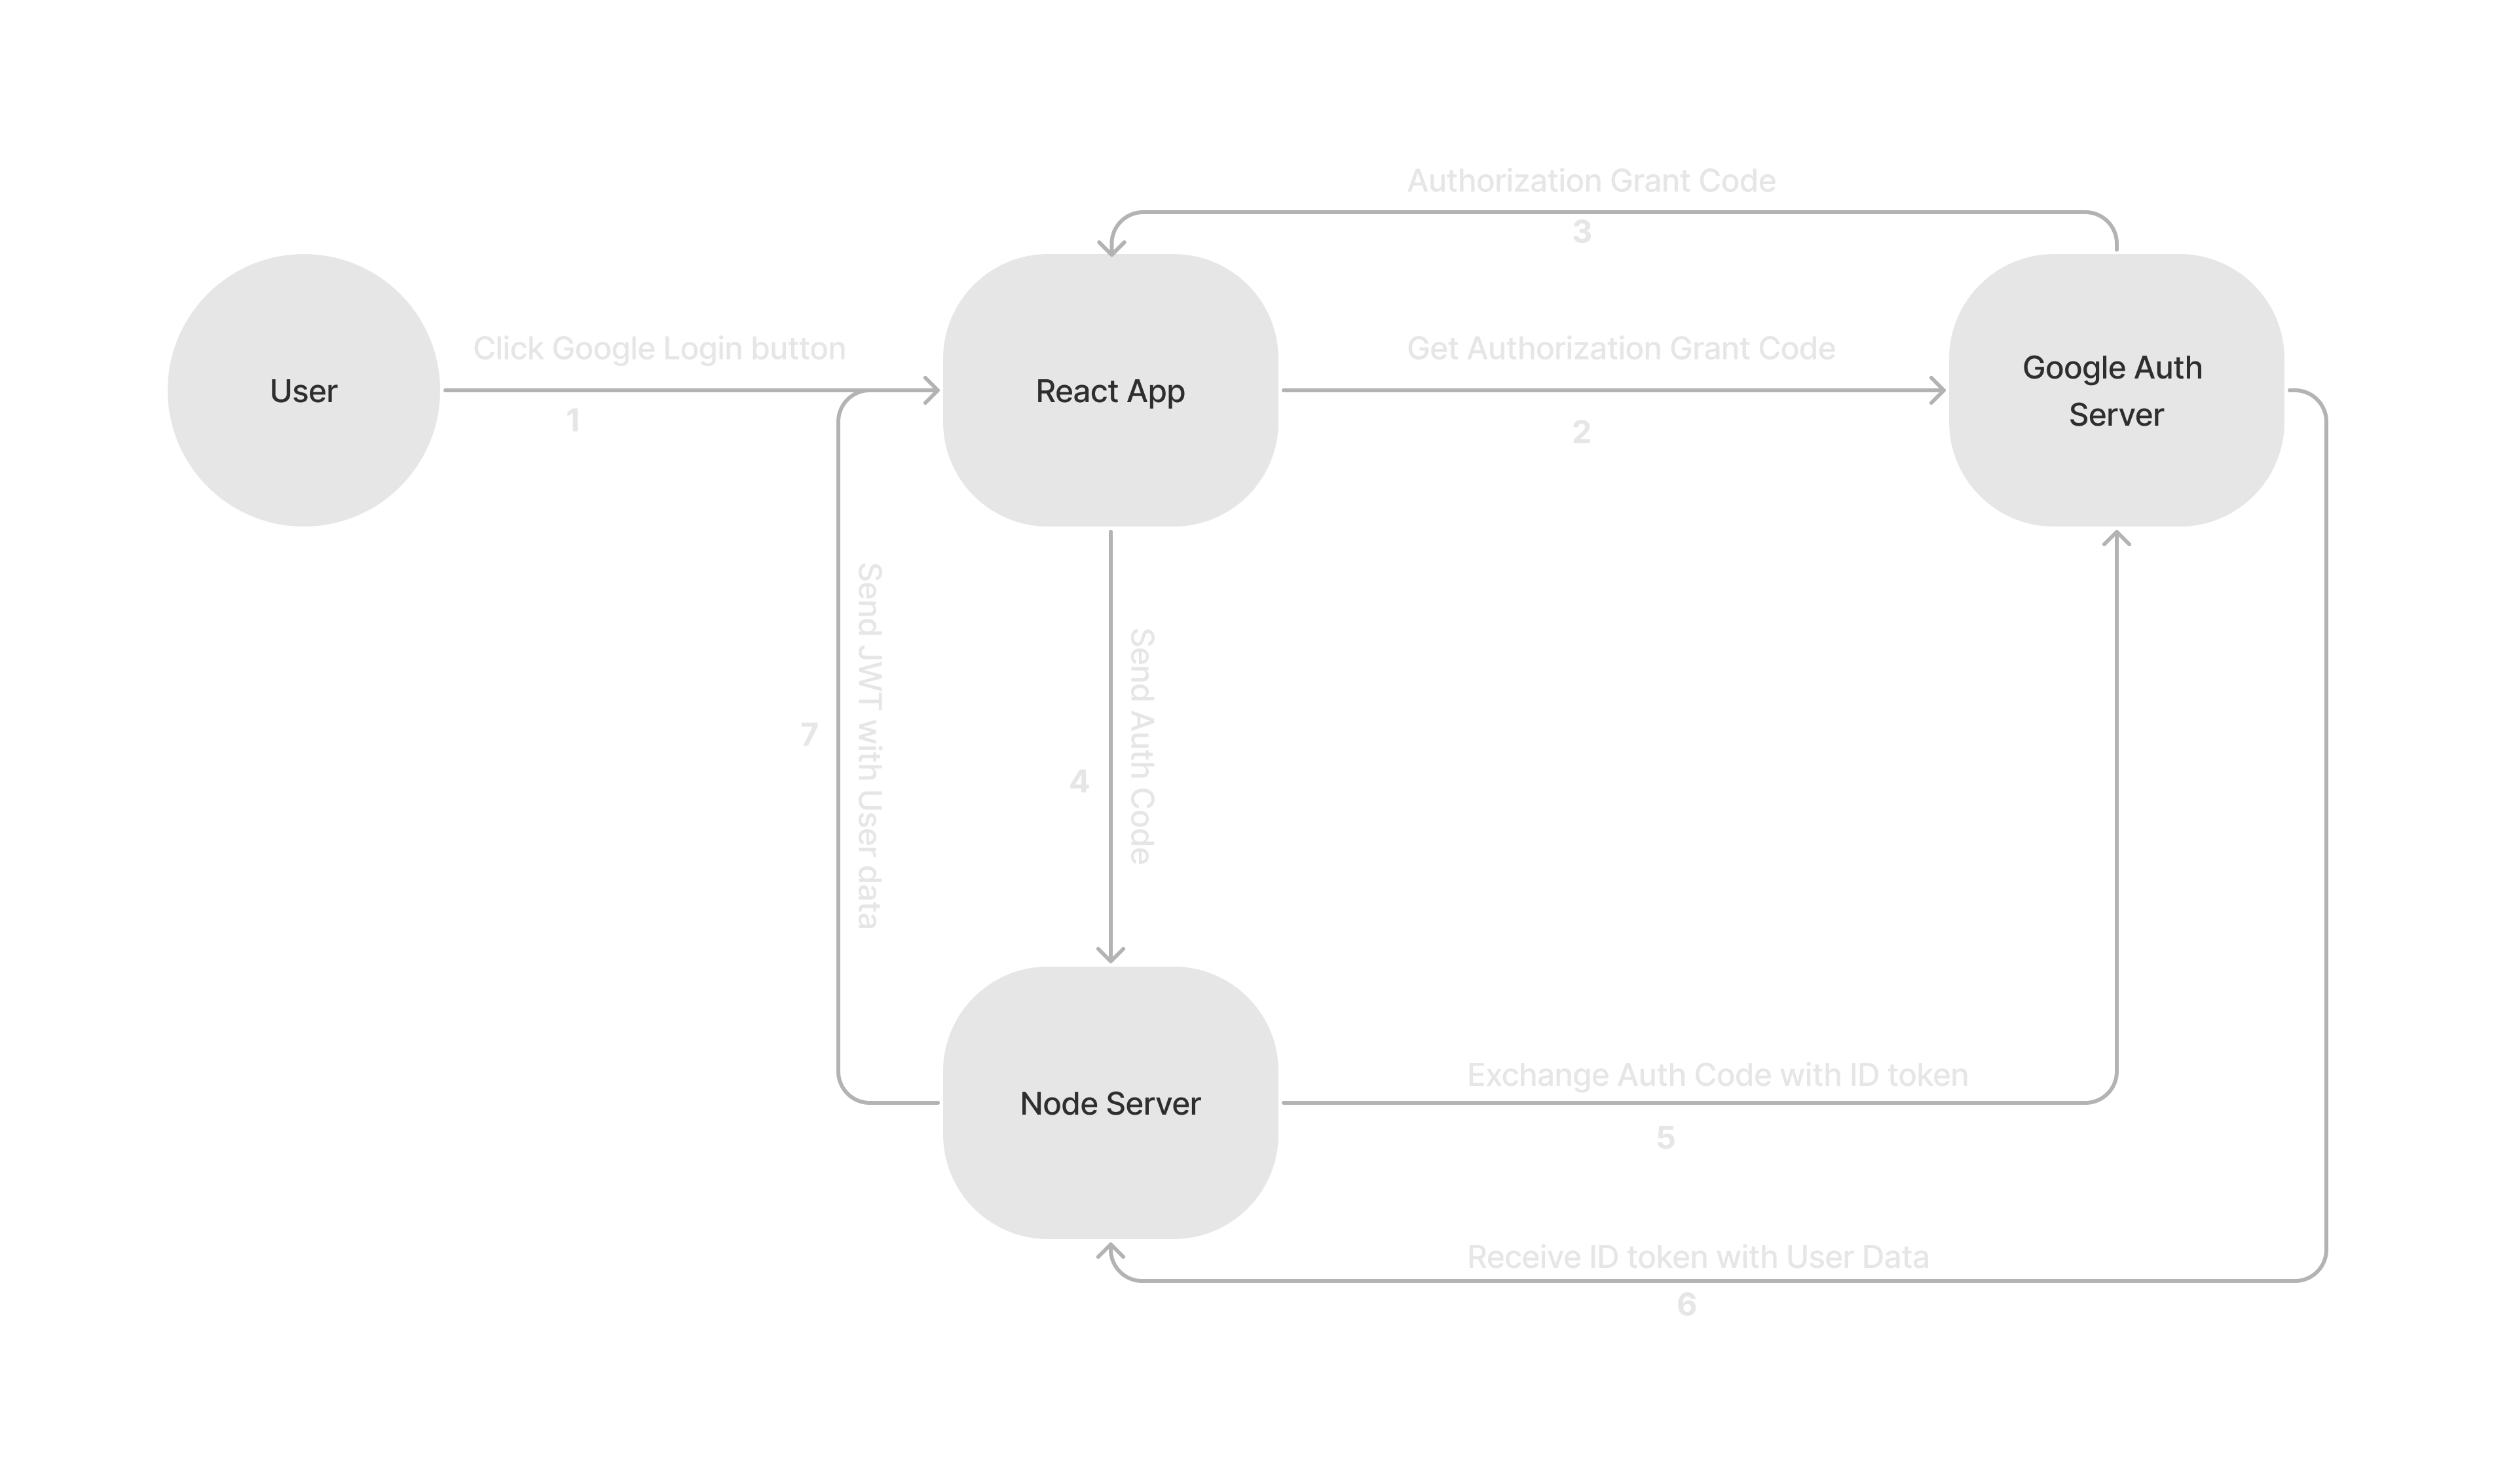
Understanding the Flow of the OAuth 2.0 system
Let’s start by understanding the flow of the OAuth system and then we will discuss all the steps in detail.
Integrating OAuth 2.0 into our WebApp
For the integration part, we will follow all the steps one by one as explained above. Let’s start by installing some required node modules.
cd ./template/client
npm i @react-oauth/google axios
STEPS 1–4:
For the user to click, let’s start by creating Login Button and wrapping the entire App in google OAuth provider.
Create a folder components inside src and create a GoogleLogin.jsx file in it. Add the code given below in this file.
/* eslint-disable import/no-anonymous-default-export */
import React from "react";
import { useGoogleLogin } from "@react-oauth/google";
import { googleAuth } from "../services/api";


export default (props) => {
    const responseGoogle = async (authResult) => {
        try {
            if (authResult["code"]) {
                console.log(authResult.code);
                const result = await googleAuth(authResult.code);
                props.setUser(result.data.data.user);
                alert("successfuly logged in");
            } else {
                console.log(authResult);
                throw new Error(authResult);
            }
        } catch (e) {
            console.log(e);
        }
    };

    const googleLogin = useGoogleLogin({
        onSuccess: responseGoogle,
        onError: responseGoogle,
        flow: "auth-code",
    });

    return (
        <button
            style={{
                padding: "10px 20px",
            }}
            onClick={googleLogin}
        >
            Sign in with Google
        </button>
    );
};
Update the App.jsxfile with the code given below.
import React, { useEffect, useState } from "react";
import "./App.css";
import { GoogleOAuthProvider } from "@react-oauth/google";
import GoogleLogin from "./components/GoogleLogin";

function App() {
    const [user, setUser] = useState();

    return (
        <GoogleOAuthProvider clientId="163584497548-6uovpebrvioqdepje90dinuagvi60ulc.apps.googleusercontent.com">
            <div className="App">
                <GoogleLogin setUser={setUser}></GoogleLogin>
                {user && user.name}
                {user && user.email}
            </div>
        </GoogleOAuthProvider>
    );
}

export default App;
Now create a services folder inside src and create an api.js file and add the code given below to it.
import axios from 'axios';

const api = axios.create({
    baseURL: "http://localhost:8000/api/v1",
    withCredentials: true,
});

export const googleAuth = (code) => api.get(`/auth/google?code=${code}`);
Explanation
First, the user click’s on the GoogleLogin button and triggers the function
googleLoginNow, this function sends a request to the google Auth Server and gets back an authorization code. These will be Steps — 2 and 3.
Now
googleLogincalls theresponseGooglefunction, which sends the authorization code to our API using thegoogleAuthfunction defined inapi.jsfile. This will be step — 4.
STEPS 5–7:
Now we will work on API.

The above flow chart shows the flow of command in our server. If you do not wish to save data in any database, you can skip steps — 4 & 5.
The server.js and app.js files are already bootstrapped with all required security measures, CORS configuration for secure cookies and an error controller.
You can also create a custom userModel and use it to save data in your database as I have done below or you can totally skip that part. But if you wish to connect to a database you should uncomment the “connect to database” section in server.js file.
Let’s start by installing required node modules in server. Enter the following code in a new terminal to install the needed modules.
cd ./template/server
npm i validator bcrypt googleapis jsonwebtoken axios
Now, let’s create a oauth2client.js file in the utils folder and add the following code in it.
const { google } = require('googleapis');

/**
 * To use OAuth2 authentication, we need access to a CLIENT_ID, CLIENT_SECRET, AND REDIRECT_URI
 * from the client_secret.json file. To get these credentials for your application, visit
 * https://console.cloud.google.com/apis/credentials.
 */
const GOOGLE_CLIENT_ID = process.env.GOOGLE_CLIENT_ID;
const GOOGLE_CLIENT_SECRET = process.env.GOOGLE_CLIENT_SECRET;

exports.oauth2Client = new google.auth.OAuth2(
    GOOGLE_CLIENT_ID,
    GOOGLE_CLIENT_SECRET,
    'postmessage'
);
Now let’s create an authController.js file in controllers folder. This file will contain all other auth-related functions. Then add the following code into it.
const axios = require('axios');
const jwt = require('jsonwebtoken');
const { promisify } = require('util');
const oauth2Client = require('../utils/oauth2client');
const catchAsync = require('./../utils/catchAsync');
const AppError = require('./../utils/appError');
const User = require('../models/userModel');

const signToken = (id) => {
    return jwt.sign({ id }, process.env.JWT_SECRET, {
        expiresIn: process.env.JWT_TIMEOUT,
    });
};
// Create and send Cookie ->
const createSendToken = (user, statusCode, res) => {
    const token = signToken(user.id);

    console.log(process.env.JWT_COOKIE_EXPIRES_IN);
    const cookieOptions = {
        expires: new Date(Date.now() + +process.env.JWT_COOKIE_EXPIRES_IN),
        httpOnly: true,
        path: '/',
        // sameSite: "none",
        secure: false,
    };
    if (process.env.NODE_ENV === 'production') {
        cookieOptions.secure = true;
        cookieOptions.sameSite = 'none';
    }

    user.password = undefined;

    res.cookie('jwt', token, cookieOptions);

    console.log(user);

    res.status(statusCode).json({
        message: 'success',
        token,
        data: {
            user,
        },
    });
};
/* GET Google Authentication API. */
exports.googleAuth = catchAsync(async (req, res, next) => {
    const code = req.query.code;
    console.log("USER CREDENTIAL -> ", code);

    const googleRes = await oauth2Client.oauth2Client.getToken(code);

    oauth2Client.oauth2Client.setCredentials(googleRes.tokens);

    const userRes = await axios.get(
        `https://www.googleapis.com/oauth2/v1/userinfo?alt=json&access_token=${googleRes.tokens.access_token}`
    );

    let user = await User.findOne({ email: userRes.data.email });

    if (!user) {
        console.log('New User found');
        user = await User.create({
            name: userRes.data.name,
            email: userRes.data.email,
            image: userRes.data.picture,
        });
    }

    createSendToken(user, 201, res);
});
Now that our authController is ready, we should add the required routes. We will add the route /api/v1/auth in app.js. Update the app.js file as shown below. Lines — 12, and 24 are updated.
const express = require('express');
const mongoSanitize = require('express-mongo-sanitize');
const xss = require('xss-clean');
const morgan = require('morgan');
const path = require('path');
const cors = require('cors');
const compression = require('compression');
const rateLimit = require('express-rate-limit');
const dotenv = require('dotenv');

const router = require('./routes/routes');
const authRouter = require('./routes/authRoutes'); // <- NEW LINE
const AppError = require('./utils/appError');
const errorController = require('./controllers/errorController');

const app = express();
.
.
.
.

app.use(compression());

app.use('/api/v1/auth/', authRouter); // <- NEW LINE
app.use('/api/v1/', router);

app.all('*', (req, res, next) => {
    next(new AppError(`Can't find ${req.originalUrl} on the server`, 404));
});

app.use(errorController); // <- Error Handling Middleware

module.exports = app;
Now create a file called authRoutes.js in routes folder and add the following code into it.
const express = require('express');
const authController = require('../controllers/authController');

const Router = express.Router();

Router.get("/google", authController.googleAuth);

module.exports = Router;
Explanation:
Whenever a google login request is sedn to out API, the
authRoutes.jsfile calls thegoogleAuthfunction.Now
googleAuthfunction get a credential token from Google’s Auth server which allows it to access user data. Then this function gets the required user data from Google’s Auth server.Then the user data is saved in the database. (optional step)
Then the
createSendTokenfunction is called which create a secure JWT cookie and send the response.
Everything is ready now. Try to sign in using your Google account. Your Name and email should be displayed in the react app.